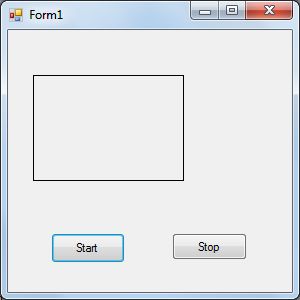
Порядок создания элементов управления

Рис. Окно дизайнера формы
Класс формы
#pragma once
namespace DrawLine1 {
using namespace System;
using namespace System::ComponentModel;
using namespace System::Collections;
using namespace System::Windows::Forms;
using namespace System::Data;
using namespace System::Drawing;
public ref class Form1 : public System::Windows::Forms::Form
{
public:
Form1(void)
{
InitializeComponent();
//TODO: Add the constructor code here
}
protected:
~Form1()
{
if (components)
{
delete components;
}
}
private: System::Windows::Forms::Button^ button1;
protected:
private: System::Windows::Forms::Button^ button2;
private: System::Windows::Forms::PictureBox^ pictureBox1;
private:
System::ComponentModel::Container ^components;
#pragma region Windows Form Designer generated code
void InitializeComponent(void)
{
this->button1 = (gcnew System::Windows::Forms::Button());
this->button2 = (gcnew System::Windows::Forms::Button());
this->pictureBox1 = (gcnew System::Windows::Forms::PictureBox());
(cli::safe_cast<System::ComponentModel::ISupportInitialize^ >(this->pictureBox1))->BeginInit();
this->SuspendLayout();
// button1
this->button1->Location = System::Drawing::Point(45, 205);
this->button1->Name = L"button1";
this->button1->Size = System::Drawing::Size(74, 31);
this->button1->TabIndex = 0;
this->button1->Text = L"button1";
this->button1->UseVisualStyleBackColor = true;
this->button1->Click += gcnew System::EventHandler(this, &Form1::button1_Click);
// button2
this->button2->Location = System::Drawing::Point(165, 205);
this->button2->Name = L"button2";
|
|
|
this->button2->Size = System::Drawing::Size(81, 30);
this->button2->TabIndex = 1;
this->button2->Text = L"button2";
this->button2->UseVisualStyleBackColor = true;
this->button2->Click += gcnew System::EventHandler(this, &Form1::button2_Click);
// pictureBox1
this->pictureBox1->BackColor = System::Drawing::Color::Beige;
this->pictureBox1->BorderStyle = System::Windows::Forms::BorderStyle::Fixed3D;
this->pictureBox1->Location = System::Drawing::Point(140, 16);
this->pictureBox1->Name = L"pictureBox1";
this->pictureBox1->Size = System::Drawing::Size(129, 120);
this->pictureBox1->TabIndex = 2;
this->pictureBox1->TabStop = false;
// Form1
this->AutoScaleDimensions = System::Drawing::SizeF(6, 13);
this->AutoScaleMode = System::Windows::Forms::AutoScaleMode::Font;
this->ClientSize = System::Drawing::Size(284, 262);
this->Controls->Add(this->pictureBox1);
this->Controls->Add(this->button2);
this->Controls->Add(this->button1);
this->Name = L"Form1";
this->Text = L"Form1";
(cli::safe_cast<System::ComponentModel::ISupportInitialize^ >(this->pictureBox1))->EndInit();
this->ResumeLayout(false);
}
#pragma endregion
private: System::Void button1_Click(System::Object^ sender, System::EventArgs^ e) {
Color ^col=gcnew Color;
Pen ^pen= gcnew Pen(col->Red);
Graphics ^im =this->CreateGraphics();
|
|
|
im->DrawLine(pen,10,10,100,100);
}
private: System::Void button2_Click(System::Object^ sender, System::EventArgs^ e) {
Color ^col=gcnew Color;
Pen ^pen= gcnew Pen(col->Blue,4);
Graphics ^im =pictureBox1->CreateGraphics();
im->DrawLine(pen,10,100,100,10);
}
};
}
Контрольные вопросы.
Практическое занятие 6.
Визуальное проектирование программ в среде VisualStudio. Анимация. Язык С++
Цели и задачи работы
Теоретические положения.
Использование анимации
Задание.
Спроектировать приложение, интерфейс которого включает форму, кнопку Start, кнопку Stop.
При инициализации формы на ней рисуется прямоугольный контур таймера
При клике по кнопке Start в на форме рисуется секундная стрелка синим цветом каждую нечетную секунду и красным цветом – каждую четную.
Интерфейс.
а) после запуска

а) после нажатия start
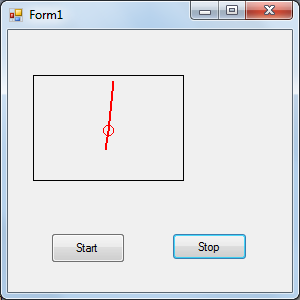
а) после истеченияодной секунды
Рис. Интерфейс приложения
Дата добавления: 2019-09-13; просмотров: 203; Мы поможем в написании вашей работы! |

Мы поможем в написании ваших работ!