Communicating Your Results: Start Planning Your Display Board
Https://www.sciencebuddies.org/science-fair-projects/topic-selection-wizard/recommendations?d=advanced&t=VeryLong&p=1 Digital Voice Analysis * Используйте программное обеспечение для записи и анализа звука для записи голосов членов вашей семьи. Можете ли вы найти способы идентификации каждого члена семьи, просто посмотрев на анализируемые звуковые модели из их голоса (например, спектральный Частотный анализ)? Разработать гипотезу о том, какие виды звукового анализа будет идентифицировать человека. Имейте вспомогательную запись дополнительных тестовых файлов членов вашей семьи, не сообщая вам, какой файл принадлежит кому. Отключите динамики компьютера и посмотрите, можете ли вы идентифицировать голоса только по анализируемым звуковым шаблонам. Затем подключите колонки обратно и посмотреть, если вы были правы!
Using a Laser to Measure the Speed of Light in Gelatin
Думаете, для измерения скорости света требуется дорогое, сложное оборудование? Снова подумать! Оборудуйте себя простой ручной лазерной указкой, транспортиром и желатином, и вы готовы начать работу.
Цель этого проекта науки измерить скорость света в желатине путем использование недорогого лазера как указатель лазера или уровень лазера.
Materials and Equipment
- A device that produces a visible laser beam, such as a laser pointer or a laser level (for example, search for "laser pointer" at Amazon.com).
- Many kinds of lasers are readily available on the market. Typically, lasers are classified by their wavelength and maximum output power, which put them into one of several classes e.g. class I, II, IIIa, IIIb, IV (please see Laser Safety Guide). When handling lasers, please keep in mind the safety measures that must be followed in order to prevent injuries.
- A mounting device on which the laser device rests that can easily indicate where the beam is pointed (it will be difficult to actually see the laser beam passing through air)
- A protractor or a homemade protractor that can easily indicate the angle of refraction inside the gelatin
- Gelatin, a clear or a light/transparent color would generally work best
- Plastic containers to mold the gelatin (of various shapes and sizes if pursuing one of the possible variations below)
|
|
|
Below is an outline of one of the ways of carrying out the experiment; again, there are multiple variations and areas where you can insert your own creativity (see below):
- First, come up with your own experimental setup. In addition to understanding the theory behind the experiment, this project calls for much experimental design creativity and hand-on "playing time." Please think about how one would measure the angle of incidence of a laser passing through the gelatin, with reference to the normal (the line that is perpendicular to the surface of the medium). Also, please consider how one could precisely direct the laser beam from the laser pointer (or laser level) at a pre-determined "entry point." What type of mounting structure would you come up with?
For example, the photo below (using a tub of liquid instead of gelatin) represents a clever setup. The laser beam was originally along the line between the tiles on the countertop (you could also use graph paper). You can see a bit of the beam exiting the laser in the center of the circle and you can see the entry point of the laser in the plastic container. These two points show the original path of the beam, and you can easily connect the points to create the original trajectory (note that the normal, which is not shown, is the line that runs perpendicular to the side of the plastic container that gets hit by the laser). Thus, we can accurately measure the angle here.

Figure 2. One possible setup for the experiment, using a plastic container of clear liquid instead of gelatin.
|
|
|
- Make your gelatin according to the directions on the box. Remove the gelatin from the container when it has set.
- Note: Try to make the gelatin in a square container (like the container shown in the photo above). If a square container is not available, use a large container and cut the gelatin in a square or "box" shape with edges that are clean and vertical. Slanted and uneven edges may cause disruption of the laser beam, so it is important that the form of the gelatin be correct.
- Note: The gelatin can be deformed if you are not careful when removing it from the container—or deformed by the tools you use to remove it. One way to remove the gelatin from the container is to set the container in hot water and let it float on the surface for a bit. This softens the edges of the gelatin inside the container, allowing you to turn the container upside-down to release the gelatin. Having the gelatin out of the container gives a clean optical interface, but gelatin may not stay straight once it is out of the mold. If the sides bulge significantly, the angles will be distorted.
- Mount the laser pointer on a pre-made device that will indicate where the beam is going and what the angle of incidence is (recall that it will be difficult to actually see the laser beam passing through air).
- Note: It is important that the laser beam be perpendicular to the surface for proper refraction results.
- Fix the laser device and record the angle of incidence with respect to the normal.
- Shine the laser through the gelatin (you may need another person to help out by holding down the button if you use a simple laser pointer) and measure the angle of refraction inside the gelatin.
- Note: Measuring the angle from the normal can be tricky. One must remember that if one looks directly into a refracting medium, i.e. perpendicular to the surface, the angles are accurate, but if one looks off the normal, the angles are distorted. For example, a straight stick thrust into water looks broken at the surface. Therefore, it is important to set up the angle measuring device properly so accurate readings can be obtained.
- Find the speed of light in gelatin: first use Snell's law (refer to the Background tab) to calculate the index of refraction of the gelatin and then apply the definition of index of refraction to find the speed of light in the medium.
Introduction
|
|
|
The law of refraction, which is also known as Snell's law, actually applies to everyday life. For example, before you answer the door and see your friend's face through the window, you see light that is refracted through the glass. Snell's law compactly describes what happens to the trajectory of a beam of light as it passes from one medium, such as air, to another, such as glass. As you apply Snell's law and the definition of index of refraction in this science project, you will be able to measure the speed of light in gelatin. The beauty of this science project also lies in how you can verify one of the most basic laws of optics, experimentally, by using readily available and inexpensive materials.
Snell's law is expressed as the following equation (see Figure 1 below for an illustration of the variables):
Equation 1:
sinθ1sinθ2=v1v2=n2n1
- θ1 is the angle between the incident light beam and the surface normal
- θ2 is the angle between the departing light beam and the surface normal
- v1 is the speed of light in the first material (in this project, air)
- v2 is the speed of light in the second material (in this project, gelatin)
- n1 is the index of refraction of the first material (in this project, air)
- n2 is the index of refraction of the second material (in this project, gelatin)

Figure 1. Definitions of the variables used in Snell's law. An incident light beam approaches the interface between two materials at angle θ1 to the normal. It passes through the interface and is refracted to angle θ1 to the normal. The first material has an index of refraction n1 and the speed of light in the material is v1. The second material has an index of refraction n2 and the speed of light in the material is v2 (image credit Wikimedia Commons user Oleg Alexandrov).
Note that Snell's law not only applies to the case of the laser beam passing through air and gelatin, but also to other examples of how the incident object changes direction as it passes from a faster medium to a slower medium, and vice versa. For example, a marching band walks together in time with the music and take the same-length steps. What if the band moves across a grassy football field at an angle, and as each band member crosses the 50-yard line, he or she suddenly finds the field very muddy and slippery? As a result, he or she steps in time but takes steps that are 20 percent shorter because of the mud. What happens then? Answer: Those who have crossed the 50-yard line are traveling at 80 percent the speed of those who have not, and the line of band members bends at the 50-yard line, just like light in this experiment. With a little thought, one can even compute the angle at which the line bends (actually the reverse of what you will be trying to do in this science project).
|
|
|
Terms and Concepts
- Law of refraction (also called Snell's law)
- Trajectory
- Index of refraction
- Incident object
Questions
- What exactly is a laser?
- What is the speed of light? What are some methods scientists have used to calculate it?
- What are some applications of Snell's law?
Bibliography
This resource provides more information about lasers:
- Wikipedia Contributors. (2010, July 6.) Laser. Wikipedia: The Free Encyclopedia. Retrieved July 12, 2010, from http://en.wikipedia.org/w/index.php?title=Laser&oldid=371975776
To learn more about Snell’s law, try these links:
- Wolfram Research. (n.d.). Snell's Law. Retrieved July 12, 2010, from http://scienceworld.wolfram.com/physics/SnellsLaw.html
- Kaiser, Peter K. (n.d.). Snell's Law. Retrieved July 12, 2010, from http://www.yorku.ca/eye/snell.htm
- Nave, R. (n.d.). Snell's Law. Retrieved July 12, 2010, from http://hyperphysics.phy-astr.gsu.edu/hbase/geoopt/refr.html#c3
- The Physics Classroom. (n.d.). The Mathematics of Refraction: Snell's Law. Retrieved July 12, 2010, from http://www.physicsclassroom.com/Class/refrn/u14l2b.cfm
The links below contain additional information about the index of refraction:
- Reed, R. (n.d.). Refraction of light. Retrieved July 12, 2010, from http://interactagram.com/physics/optics/refraction/
- Wolfram Research. (n.d.). Index of Refraction. Retrieved July 12, 2010, from http://scienceworld.wolfram.com/physics/IndexofRefraction.html
- Nave, R. (n.d.). Index of Refraction. Retrieved July 12, 2010, from http://hyperphysics.phy-astr.gsu.edu/hbase/geoopt/refr.html#c2
News Feed on This Topic
Variations
There are many areas of this project where one can use his/her own creativity:
- Laser mounting device. Make your own device to ensure that the laser beam precisely enters the gelatin at the pre-determined entry point.
- Measuring scheme for the angle of refraction. Design your own scheme to measure the angle of refraction inside the gelatin. For example, where would you place a custom-made protractor to indicate the angle of refraction with respect to the normal?
- Faster or slower gelatin. Attempt to change the index of refraction of the gelatin and create "faster" or "slower" media. For example, what happens when one dissolves various amounts of sugar in a well-mixed gelatin solution? Does the index of refraction of the gelatin change? Consequently, how does the speed of light in gelatin change? Note that one can represent the concentration of the sugar-gelatin solution by doing a one-step percent composition by mass calculation, which is basically the mass of the solute divided by the mass of the solution (mass of solute plus mass of solvent), multiplied by 100.
For example: Determine the percent composition by mass of a 100 g salt solution which contains 20 g salt
Solution: 20 g NaCl / 100 g solution x 100 = 20% NaCl solution
From the table shown below, we see that the index of refraction for a 30% sugar solution is 1.38 while for an 80% solution, is 1.49. Can you verify a positively-correlated trend for sugar?
- Other readily available materials. Calculate and verify the indices of refraction of other readily available materials like household liquids or ice. For example, ethyl alcohol has an index of refraction of 1.36, while ice's is 1.31. Can you verify this? A table of indices of refraction for commonly found materials is shown below. Note that extra caution must be taken if you are using a plastic container to hold the liquid as the container itself serves as an interface between the laser and the media. Please think about ways to minimize this distortion. For example, can you try to aim the laser at the surface of the liquid (at an angle with respect to the normal) from above? How would you measure the angle?
| Material | Index |
| Vacuum | 1.00000 |
| Air at STP | 1.00029 |
| Ice | 1.31 |
| Water at 20 °C | 1.33 |
| Acetone | 1.36 |
| Ethyl alcohol | 1.36 |
| Sugar solution (30%) | 1.38 |
| Fluorite | 1.433 |
| Fused quartz | 1.46 |
| Glycerine | 1.473 |
| Sugar solution (80%) | 1.49 |
| Plexiglas | 1.51 |
| Crown glasses | 1.52-1.62 |
| Sodium chloride | 1.54 |
| Polystyrene | 1.55-1.59 |
| Carbon disulfide | 1.63 |
| Flint glasses | 1.57-1.75 |
| Methylene iodide | 1.74 |
| Sapphire | 1.77 |
| Rare earth flint | 1.7-1.84 |
| Lanthanum flint | 1.82-1.98 |
| Arsenic trisulfide glass | 2.04 |
| Diamond | 2.417 |
| Gallium phosphide | 3.50 |
Table 1. Indices of refraction for commonly found materials.
- Making lens cross-sections out of gelatin, then "ray trace" with the laser. Basically, ray tracing involves establishing the position and orientation of an object's image by tracing strategic rays of light from the object passing through the lens, using knowledge of the focal length of the lens and the position of the object. Here is an introduction: http://boson.physics.sc.edu/~rjones/phys153/raytrace.html
A Magnifying Discovery
Experimental Procedure
- Pull out a piece of scotch tape and place it on a non-stick surface, like a piece of wax paper.
- Using your ruler and permanent marker, mark points along the tape indicating centimeters and millimeters.
- Using scissors cut the length of the tape to fit inside the diameter of your magnifying lens.
- Stick the tape to the diameter of the lens. You will use this as a guide to make your optical measurements.

- Now fold a drinking straw in half around the ruler. Tightly tie a piece of string around the ends of the straw so that it is tied around the ruler. The straw should slide up and down along the ruler without slipping.

- Now tape the handle of your magnifying glass onto the ends of the straw, so that the magnifying glass is perpendicular to the ruler. Jab the end of the ruler into a chunk of clay and secure the clay to the table so that your apparatus will not slip or topple over. Make sure that the end of the ruler is touching the surface of the table. This will ensure that your measurements of the height of the lens will be accurate.

- Now you are ready to measure your objects with your magnifying lens apparatus. First collect items to measure and organize them into a data table. You will need a data table to keep track of your measurements:
| Object | Actual Size (cm) | Height of Lens (cm) | Optical Size (cm) |
- Now take one of your objects and measure the actual size of the object along the length (if it is a long object) or diameter (if it is a round object like a penny). Write down your measurement in a data table.
- Place the object on the table beneath your apparatus.
- Adjust your magnifying glass lens to a fixed height above the table using your ruler as a guide by moving the adjustable straw. Write down the height of the lens in your data table.
- Now look through the lens of the magnifying glass. Using your taped on ruler as a guide, indicate the size of the object as it appears in the lens. This measurement may or may not match the actual size of the object. Write the optical size measurement in the data table.
- Continue to change the height of your magnifying lens, and taking optical measurements of your objects. Remember to write both the height of the lens and measurement of the object in your data table each time.
- After collecting your data, it will be helpful to make a graph to help you interpret your data and think about the relationship between the height of the objective and the optical size of each object.
Communicating Your Results: Start Planning Your Display Board
Materials and Equipment
- large magnifying glass with a sturdy handle
- ruler
- permanent marker
- scotch tape
- wax paper
- drinking straw
- string or twisty tie
- chunk of clay
- small objects to measure (penny, typed or printed letter, bean, rice grain, etc.)
Introduction
Optics is the study of light and how light travels through different objects in different ways. Have you ever looked through a glass of water at something? You will notice that the object looks smaller through the glass than when you look through the air. This is because light travels differently through the glass and the water, causing the image to bend. Your eyes perceive this as a smaller object, even though your brain knows that the object is still the same size.
Physicists use the power of optics to make many different kinds of lenses to see different kinds of things better than the naked eye. Powerful telescopes can see far into space, making far away objects look closer and brighter. Powerful microscopes make tiny microscopic objects look much bigger, so that our eyes can see them in more detail. Many important discoveries in biology, chemistry, astronomy and other sciences have been made using the power of optics.
We also use optics in some things we use around the house. If you or your parents wear glasses, your doctor used optics to find a prescription for a lens to help you see better. If you like to go bird watching, then you have used a pair of binoculars to see birds in far off distances. A magnifying glass can be used to read tiny print, look at insects or to do a small hobby or craft.
One important factor for any lens is the power of magnification, a measurement of how much bigger the lens will make an object appear. When you use a magnifying lens to look at an object you can compare the actual size of the object (the real size of what you are looking at) to the apparent size of the object (the size your object looks like it is when you look through the lens). The magnification power of a lens can change depending upon how close the lens is to the object you are looking at, something called optical distance.
In this experiment, you can use a magnifying glass to make your own apparatus to discover the relationship between the optical distance and magnification of a lens.
Terms and Concepts
To do this project, you should do research that enables you to understand the following terms and concepts:
- magnification
- optics
- lens
- objective
- optical distance
- actual measurement
- optical measurement
Bibliography
- Irving, Bruce. 2003. "Optics for Kids." Optical Research Associates. Pasadena, CA. [12/27/05]
http://www.opticalres.com/kidoptx.html - Davidson, Michael W. and Tchourioukanov, Kirill I. 2004. "Science, Optics & You: Simple Magnification." Molecular Expressions. [12/27/05]
http://micro.magnet.fsu.edu/primer/java/scienceopticsu/microscopy/simplemagnification/
News Feed on This Topic
The Magnifying Effect of a Water Drop, Scientific American, July 2, 2015
Explore Magnification with a Drop of Water, Science Buddies Blog, July 2, 2015
A telescope for the eye: New contacts may improve sight for macular degeneration patients, EurekAlert!, June 27, 2013
Abstract
Have you ever looked through a magnifying lens? Why do things look bigger when you look at them through the magnifying lens? Even though the object appears to get larger, it really stays the same size. Each lens has its own unique power of magnification, which can be measured with a ruler. How powerful is your lens?
Objective
In this experiment you will measure the apparent size of an object through a magnifying lens at different optical distances compared to the actual size of the object and discover a relationship between magnification and optical distance of a lens.
Credits
Sara Agee, Ph.D., Science Buddies
Cite This Page
MLA Style
Science Buddies Staff. "A Magnifying Discovery" Science Buddies. Science Buddies, 28 July 2017. Web. 27 Jan. 2018 <https://www.sciencebuddies.org/science-fair-projects/project-ideas/Phys_p021/physics/magnifying>
APA Style
Science Buddies Staff. (2017, July 28). A Magnifying Discovery. Retrieved January 27, 2018 from https://www.sciencebuddies.org/science-fair-projects/project-ideas/Phys_p021/physics/magnifying
Variations
- Magnification is the ratio between the apparent size of an object and its true size. From your graph, you can actually calculate the magnification of your lens by using a formula. A formula is a description of how to use math to calculate something from data you have collected. Here is a simplified formula to calculate the magnification of a lens. Use it to calculate the magnification of the lens in your experiment.
| Magnification | Apparent Size Actual Size |
- Different types of lenses bend light in different ways, which make a big difference to how your eyes will see objects through a lens. Some shapes of lenses will make objects smaller rather than larger, or will cause the object to appear upside down. There are many different shaped lenses, which fall into two main categories: concave or convex. Experiment with different shapes and combinations of lenses to see how they change how an object will appear.
Kaleidoscope Science
Abstract
A kaleidoscope is a fun toy that creates amazing images when you look into it. Wouldn't it be fun to create those images yourself? Check out this project to learn how to build your own kaleidoscope and to learn how the inside of a kaleidoscope works. Then you can create and adjust your own amazing, colorful images!
Objective
Find out if adding more mirrors to a kaleidoscope increases the number of reflections you see.
Credits
Ben Finio, PhD, Science Buddies
Cite This Page
MLA Style
Science Buddies Staff. "Kaleidoscope Science" Science Buddies. Science Buddies, 28 July 2017. Web. 27 Jan. 2018 <https://www.sciencebuddies.org/science-fair-projects/project-ideas/Phys_p095/physics/kaleidoscope-science>
APA Style
Science Buddies Staff. (2017, July 28). Kaleidoscope Science. Retrieved January 27, 2018 from https://www.sciencebuddies.org/science-fair-projects/project-ideas/Phys_p095/physics/kaleidoscope-science
Introduction
Have you ever played with a kaleidoscope? A kaleidoscope (pronounced kuh-LIE-duh-scope) is a toy that can produce amazing patterned images when you look into it, like the one shown in Figure 1.

Figure 1. An example kaleidoscope image (Wikimedia commons user Hide-sp, 2007).
How does a kaleidoscope work? A kaleidoscope consists of a tube with several mirrors on the inside. Mirrors are special surfaces that reflect (or bounce back) light very clearly, as shown in Figure 2. When you look into a mirror, you see a reflection of yourself, which is created by light that bounced back to your eyes off the mirror. Can you think of some places where you see mirrors in everyday life?

Figure 2. This picture shows a real cup and a reflection of the cup in a mirror.
Now that you know a kaleidoscope is a tube with mirrors inside, how does a kaleidoscope make amazing images like the one in Figure 1? The answer is using multiple mirrors to make multiple reflections of small, colorful objects. Figure 3 shows an assembled kaleidoscope. On one end of the tube, the kaleidoscope has a small chamber (an end cap) to hold colorful objects, like small plastic beads. On the other end of the tube, the kaleidoscope has an eyepiece, or the part that you look through. When you look through the eyepiece, you see the reflections of the colorful objects in the mirrors, creating the fantastic images like the one in Figure 1!

Figure 3. A labeled diagram of the kaleidoscope you will use in this science project.
Figure 4 shows a cut-away view of the inside of the kaleidoscope. This kaleidoscope has three mirrors arranged in the shape of a triangle, creating multiple reflections. When you look into a kaleidoscope like this, you will see an image like the one in Figure 1.

Figure 4. A cut-away view showing the inside of the kaleidoscope. The kaleidoscope has three mirrors (shown in light blue) arranged in a triangle, running the length of the tube (shown in brown). The plastic end cap and eyepiece are clear.
Imagine that you put a single colored bead in a kaleidoscope, and then cover up all the mirrors with black pieces of paper. What do you think you would see when you looked into the kaleidoscope? Do you think it would be something like the diagram in Figure 5?
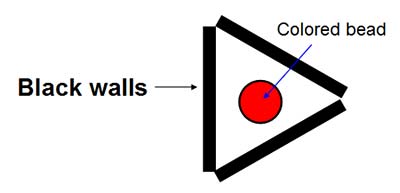
Figure 5. If you looked down a kaleidoscope that had solid black walls instead of mirrors, you would not see any reflections.
Now, what if you removed one piece of black paper, exposing a mirror? What would you see? You would see a single reflection, like in Figure 6.
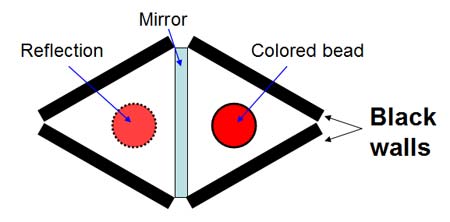
Figure 6. In a kaleidoscope with just one mirror and two black walls, you would only see a single reflection.
Now, what do you think will happen if you remove another piece of paper, exposing a second mirror? Will the number of reflections increase, or will the image stay the same? What if you remove the final piece of paper, exposing all three mirrors? In this science project, you will find out what happens when you look into a kaleidoscope with different numbers of mirrors.
Terms and Concepts
- Kaleidoscope
- Mirror
- Reflect
- Reflection
- Eyepiece
Questions
- What are the main parts of a kaleidoscope?
- How does a kaleidoscope work?
- Do you think a kaleidoscope with two uncovered mirrors will have more reflections than a kaleidoscope with just one mirror?
- What about a kaleidoscope with three uncovered mirrors? Will it have more reflections?
- Is it possible for a kaleidoscope to create infinite reflections, that gradually fade off in every direction?
Bibliography
The following references will help you learn more about kaleidoscopes.
- The Kaleidoscope Book. (n.d.). Kaleidoscope Mirror Systems. Retrieved May 26, 2014, from http://www.thekaleidoscopebook.com/thescopebook/scope-resources/kaleidoscope-mirror-systems?showall=&limitstart.
- Kaleidoscopes USA. (n.d.). How Kaleidoscopes Work. Retrieved May 26, 2014, from http://www.kaleidoscopesusa.com/about/how-kaleidoscopes-work/.
Materials and Equipment
Three-mirror kaleidoscope kit, available from Amazon.com
Black cardstock or construction paper (1 piece)
Scissors
Pencil
Optional: Digital camera to take photos of your kaleidoscope images
Lab notebook
Experimental Procedure
Assembling Your Kaleidoscope
- Your kaleidoscope kit should come with a diagram and assembly instructions. Have an adult help you follow the instructions to put your kaleidoscope together. You can also refer to the general directions and Figure 7 as a guide, but remember that your kit's specific directions may be different.
- Optional: Use the stickers provided to decorate your cardboard tube.
- Insert some colored beads or other objects from your kaleidoscope kit into the plastic end cap.
- Slide the end cap onto the cardboard tube.
- One at a time, slide the three mirrors into the cardboard tube to form a triangle.
- Slide the plastic eyepiece onto the other end of the cardboard tube.

Figure 7. The pieces used to assemble a kaleidoscope (left), and a completed kaleidoscope (right).
- Cut out two additional pieces of black cardstock.
- Your kaleidoscope kit should already have one piece of black cardstock that is the same size as the mirrors.
- Use a pencil to trace two copies of the shape of the black strip onto a new piece of cardstock.
- Have an adult help you use scissors to cut out two more pieces of black cardstock or construction paper that are the same size, as shown in Figure 8.

Figure 8. Strips of black cardstock that you will use to cover the kaleidoscope's mirrors.
Doing the Experiment
- Create a data table like Table 1 in your lab notebook. You will use this table to record your predictions and the actual results of your experiment.
- Note: You do not need to copy down the questions in the third and fourth columns. Those are there to help you fill in the answers in your table.
| Number of Uncovered Mirrors | Drawing of Mirrors | Prediction | Observation |
| 0 | 
| Will you see any reflections at all? (yes or no) | Did you see any reflections at all? (yes or no) |
| 1 | 
| Will you see more, the same, or fewer reflections than with 0 mirrors? | Did you see more, the same, or fewer reflections than with 0 mirrors? |
| 2 | 
| Will you see more, the same, or fewer reflections than with 1 mirror? | Did you see more, the same, or fewer reflections than with 1 mirror? |
| 3 | 
| Will you see more, the same, or fewer reflections than with 2 mirrors? | Did you see more, the same, or fewer reflections than with 2 mirrors? |
Table 1. Data table in which to record your predictions and results.
- Before you start collecting data, you need to cover up all three mirrors with your black cardstock strips.
- Remove the eyepiece from the kaleidoscope. Slide in a piece of black cardstock so it completely covers one mirror, as shown in Figure 9. Ask an adult if you need help.
- Repeat this process with the other two strips of cardstock, so all three mirrors are covered.
- Put the kaleidoscope's eyepiece back on.

Figure 9. Push a piece of black cardstock into the tube, lengthwise, until it completely covers one mirror.
- Now you are ready to make your first prediction.
- When you look into the kaleidoscope, do you think you will see any reflections? Don't look just yet!
- Write down your prediction in the first row of your data table.
- Make your first observation.
- Look into your kaleidoscope. It will help if you aim the kaleidoscope at a plain background, like a wall or a piece of paper.
- Do you see any reflections? Write down your observation in the first row of your data table.
- If you are using a digital camera, get an adult to help you take a picture through the kaleidoscope's eyepiece. If you do not have a camera, you can make a drawing of what you see.
- Remove the kaleidoscope's eyepiece and pull out one piece of paper, uncovering a mirror.
- Make your second prediction.
- When you look into the kaleidoscope with one mirror, do you think you will see more, the same, or fewer reflections than you did with zero mirrors?
- Write down your prediction in the second row of your data table.
- Make your second observation.
- Look into the kaleidoscope, which now has one mirror exposed.
- Do you see more, the same, or fewer reflections than you did with zero mirrors? Record your observations in the second row of the data table.
- Remember to take a picture if you are using a digital camera, or making a drawing.
- Repeat steps 5–7 for your third prediction and observation, using two mirrors.
- Repeat steps 5–7 for your fourth prediction and observation, using all three mirrors.
Analyzing Your Results
- What happens as you uncover more mirrors in a kaleidoscope? Does the number of reflections increase, decrease, or stay the same each time?
- How well do your observations match up with your predictions? Were you able to predict correctly?
Variations
The kaleidoscope in this project used three mirrors of equal size to form an equilateral triangle. The sides of an equilateral triangle have 60° angles between them. What happens if you change the angles between mirrors in a kaleidoscope? Hint: You will need to make your own "tube" to test this (for example, from a rolled-up piece of cardstock). You can also buy additional mirrors with different dimensions at an arts and crafts store.
Try making a kaleidoscope with more than three mirrors. You may need to purchase a second kaleidoscope kit, or purchase individual mirrors at an arts and crafts store, in order to do this.
How does the kaleidoscope image change when you change the number of colored beads (or other objects) in the end cap? Does it make a difference if you use just one bead instead of a handful of beads?
Дата добавления: 2018-02-28; просмотров: 422; Мы поможем в написании вашей работы! |

Мы поможем в написании ваших работ!