Promoting the Community of the Like-Minded
Each lucky owner of ScratchDuino.Robokit project constructor, be it a teacher or parents, with time starts to feel some disappointment: what is next? As a rule, their ideas of creating new projects quickly come to an end. However, if there is a place where you can show off your projects and get them commented, or watch the ready projects of other people, your creativity gets a new impetus. The Internet communities are just about that, and they resemble the thematic clubs where there are no differences caused by the age or the level of skills. For Project ScratchDuino, the place for such socializing is the Wiki portal wiki.scratchduino.com. In this section, we consider the recommendations for new members of this community.
Wiki Portal of Project ScratchDuino: Signing up
1. Navigate to http://wiki.scratchduino.com and and in the top-right corner find a link Log in / create account (Fig. 47).


Fig. 47. Signing up at http://wiki.scratchduino.com .
2. The login page opens, where you are going to enter your login and password later on. For the first time, select the link Create an account (Fig. 48).

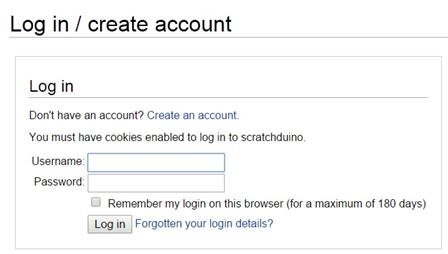
Fig. 48. Login page (with the link to get to creating of an account) .
3. Fill in the information about yourself. Keep in mind that the login of your account is going to represent you at the website. By this reason, choose the login as your nickname that makes you recognizable. For example, if your name is John Doe, your login can be John Doe, John, Doe etc. Avoid the impersonal names. Click the Create account button.

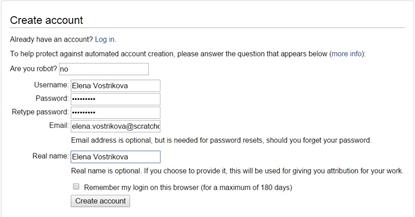
Fig. 49. The fields to fill in at creating an account .
4. If all the fields are filled correctly, you will see a notification similar to shown in Fig. 50:

Fig. 50. A notification about successful creation of an account .
5. Check your Inbox and make sure that the message has not got into Junk Mail. The sample body of the message sent to your email address is shown in Fig. 64. Click the link within the message (Figs. 51 and 52).

Fig. 51. The subject of the message in your Inbox folder .
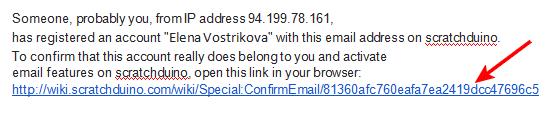
Fig. 52. The body of the message in your Inbox folder .
6. On clicking the link in the message, you get to the project website at a page with the wording shown in Fig. 53:
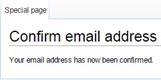
Fig. 53. The page appearing after the confirmation of your email address .
7. Proceed with creating your personal page, where you can upload your projects for the sake of ideas exchange and discussions. Many of the members of ScratchDuino Wiki portal have never met each other, so it would be nice to place at the page a photo portrait of yours. It is advisable to choose the one showing you in a good mood, as making the robotic projects is a pleasure after all! The size of the photo file must not exceed 2MB. Accepted are file formats PNG, GIF, JPG, JPEG.
|
|
|
8. Select the link Upload file in the left menu of the portal. At the page that opens find and click the upper button Upload file. Browse your PC to choose the appropriate photo file. This file will be displayed at the page. However, it isn’t uploaded yet! At the bottom left of the page, find the Upload file button. Click it.


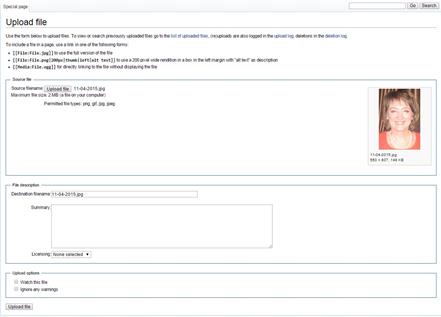
Fig. 54. The Upload file buttons .
 9. As a result, the page with the uploaded file will look like shown in Fig. 55. Скопируйте имя страницы Copy the title of the page. In our example it is File:11-04-2015.jpg.
10. Now, create the proper page of ScratchDuino
community member at the portal http://wiki.
scratchduino.com. Take notice that your account name at the top of the page is highlighted red (Fig. 56). It means that the page has got a title, but isn’t created yet! Click on the account name.


Fig. 56. From now on, your page has a title, but is not created so far .
11. You'll get to the page with the message shown in Fig. 57.
 .
.
Fig. 57. The page where you are offered to create a personal page .
Select the link Edit this page.
12. A window of a text editor will open.

Fig. 58. Your page in the Editing mode .
For members of the community, a template of personal page is provided. To create a page, it is enough to enter the phrase {{subst:Template:Personal user page}} very carefully (without any mistake) and click the Save page button. As a result, your page will be created with a standard content (Fig. 59).
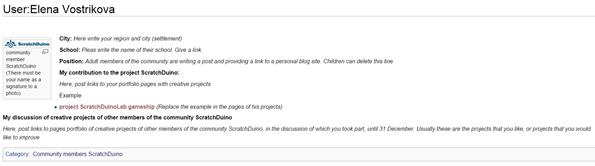
Fig. 59. Standard content of your page .
13. Go to the Edit tab. Fill in the mandatory lines at Personal page of Community member ScratchDuino. Replace the filename Logo-1024be1-300x54.png with the filename of your own photo. Instead of “Community member ScratchDuino”, type in your Name and Surname etc.
|
|
|
For example, in the Editing mode a personal page can be made as follows:
[[File:11-04-2015.jpg|thumb|100px|left|Elena Vostrikova]]
'''City:''' [https://en.wikipedia.org/wiki/Novokuznetsk Novokuznetsk] Russia
'''School:''' [http://ipknk.ru municipal autonomous educational institution of additional education "Training Institute"]
'''Position:''' department manager
'''My contribution to the prоject ScratchDuino:'''
[[Project ScratchDuinoLab gameship]]
'''My discussion of creative projects of other members of the ScratchDuino community'''
null
[[Category: Community members ScratchDuino]]
14. Click theSave page button.
For the sake of security, the system will ask you to enter a codeword (Fig. 60). Type it in and click the button Save pageagain.

Fig. 60. A check to ensure that the portal
is addressed by a human and not by a bot.
On saving the changes, a standard page will be your very own and individual!
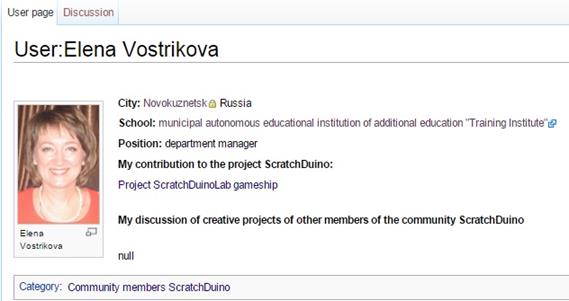
Fig. 61. Your page with personal content .
Click on the category Community members ScratchDuino, and you’ll get to the page with the list of those who have created their pages and are preparing (or are ready) to upload their projects. Now you can explore the community members’ pages and participate in the discussions on completed projects.
wiki.scratchduino.com: Uploading a Project
If you have created a project that you think exciting and you are ready to share it with the community, then send your brainchild to the annual ScratchDuino Libre Robotics Festival.
At your personal page in the Editing mode, add a name of the page to place your project at. For this, you need to type in the name adherent to following conventions:
1) The name must begin with the word Project.
2) After a blank space, mention the nomination relevant to your project.
3) The name must be unique and not coinciding with the name of any other project. To ensure this, go to [[Category: Projects]] and check if the name is not used by anybody else.
An example of such a name follows:
* '''[[Project ScratchDuino.Lab gameship]]'''
|
|
|
Click the button Save page!

Fig. 62. The page of project portfolio has got a name,
but hasn’t been created yet .
Click the newly-created link and go to the Editing mode for the new page.

Fig. 63. Editing mode for a new page .
For the Festival participants, the template is provided to make the deployment of a project portfolio easy. To create the page, it would be enough to type in (very carefully, without mistakes) the phrase {{subst:Template:Festival project ScratchDuino}}and click the Save page button.
As a result, the portfolio of the project will be deployed.
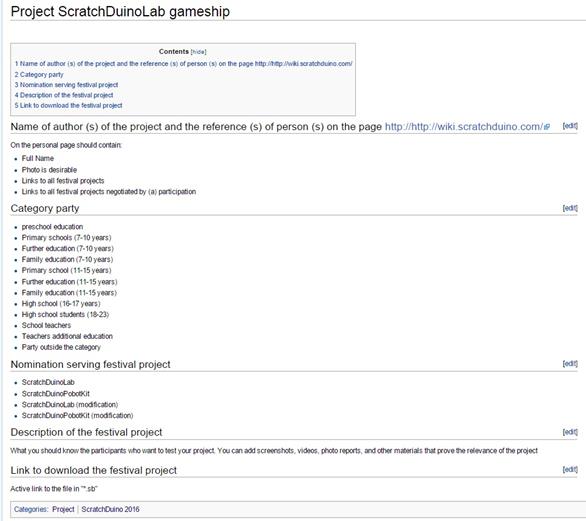
Fig. 64. A template page for a project portfolio .
Next, it is important to fulfill all the sections of the portfolio. Below, a ready portfolio (in editing mode) is shown.
==Name of author (s) of the project and the reference (s) of person (s) on the page http://http://wiki.scratchduino.com/==
[[User:Elena Vostrikova]]
==Category party==
Party outside the category
==Nomination serving festival project==
ScratchDuinoLab
==Description of the festival project==
Once in the era before the advent of computers and the Internet, children were playing Battleship on the slot machines. Now you can play its online version at this address http://morskoy-boy.15kop.ru/game/
We have created a semblance of the game. At the top of the screen, there are sail boats, while at the bottom of the screen there is a gun. The gun is moved by the left and right buttons on ScratchDuinoLab. When you press the upper button, the gun fires and the game pauses. When you press the lower button, the game continues. The game has several levels. Each level increases the speed of the ships. If you miss, your life shortens. At the background of the game the sea creatures are floating.
==Link to download the festival project==
[https://goo.gl/U5RCYx Active link to the file in "*.sb"]
[[Category: Project]]
[[Category: ScratchDuino 2016]]
Click the button Save page!
From now on, your project is available for the whole community. The comments can be read and written at the project page, at the Discussion tab.
Rules on Discussing the Projects at wiki.scratchduino.com
|
|
|
The Festival is not a contest but a live exchange of ideas, findings, and ready projects, as well as a permanent search of the best ways to introduce the libre robotics. That is why, along with the number and the quality of the projects uploaded, the Expert Group will consider also the number and the quality of the discussions led by a participant.
The discussion is always a dialogue: one person puts questions and another person answers. If somebody has left a question for you at the Discussion tab (Fig. 65), or there are criticisms or ideas offered to make your project better, it is considered a good practice to thank for the question and give a detailed answer, to agree with a criticism or retort against it, to consider and accept (decline) the suggestions.

Fig. 65. The Discussion tab
at the page of project portfolio .
To not reduce the discussion to just a mutual exchange of emoticons or rather meaningless sentences like “Great!” or “Cool!”, we would suggest a “3-2-1” strategy. It means that you have to put THREE questions, give TWO criticisms, and offer ONE improvement. An example of a discussion following such strategy is shown in Fig. 67. On completing your message, click the Your signature and timestamp button. You will see a character string --~~~~. Then click the Save the page button.
You should be nice and polite with the people, especially as you are a perfect stranger for them. When discussing a project, avoid the harsh phrases like “Your stuff is nonsense!” in favour of something like “This idea needs certain refinement.” It is not easy to start developing a worthy project at once, and it is important to encourage the newbies. A friendly word can lend them wings!
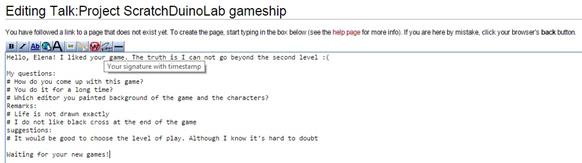
Fig. 66. An example of a discussion page
in Editing mode .
You might begin your questions with:
· When? How? Where? Why?
· Is it right to believe that … ?
· What if … ?
· Is it possible to … ?
· At which line of the script … ?
· etc.
The advisable introductory phrases for your comments might be as follows:
· It would be better if …
· On clicking ..., … (point to a mistake that the author has not noticed)
· It’s a pity that ... is missing
· etc.
You should make your suggestions as if you are in the stead of the author. There is always a way of getting the project better. We are looking for the best solutions together, so any useful idea to help the author is welcomed.
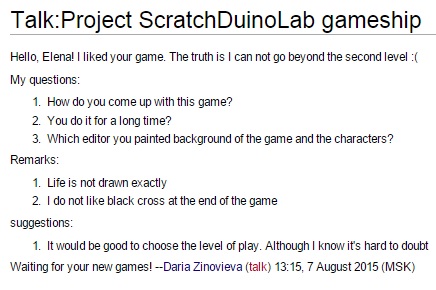
Fig. 67. An example of a discussion page
in Read mode .
 The Expert Group of the Festival does not deal with the anonymous messages! Having your message complete, always click the button Your signature and timestamp.
Information Sources
Дата добавления: 2019-01-14; просмотров: 269; Мы поможем в написании вашей работы! |

Мы поможем в написании ваших работ!