Windows Forms. Создание кнопки
Задание.
Создать приложение, которое имеет окно формы с одной кнопкой и на которой нарисована линия.
Вид интерфейса.
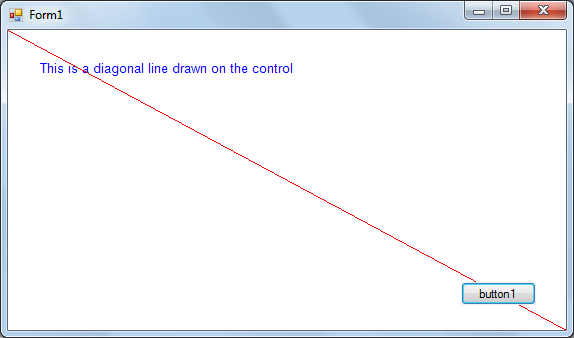
Рис. Вид формы приложения
Порядок проектирования элемента управления
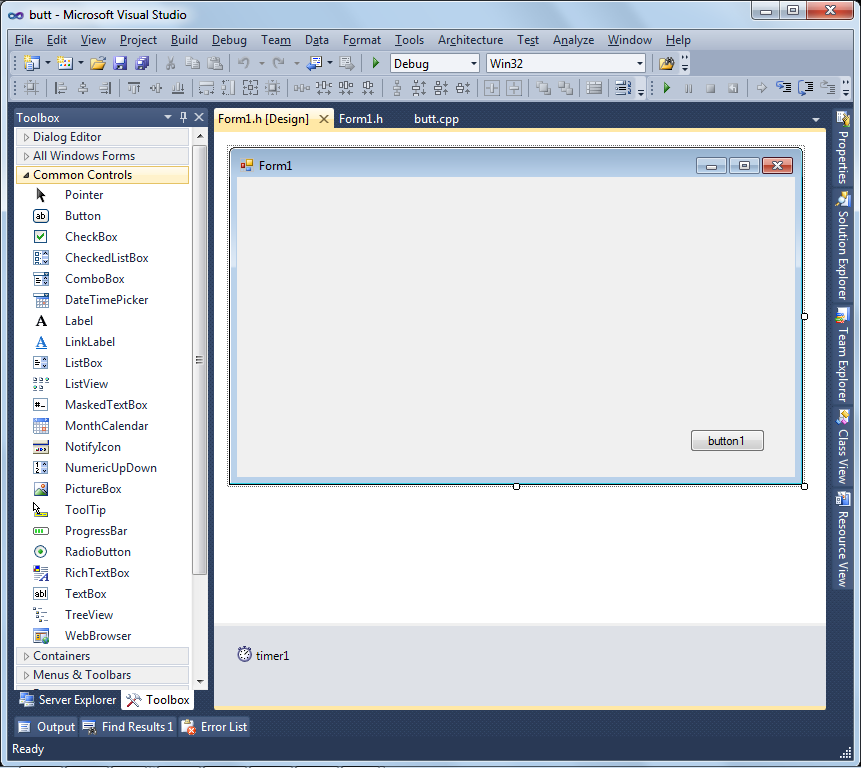
Рис. Дизайнер формы
Порядок проектирования рисования линии на форме
Класс формы
#pragma once
namespace butt {
using namespace System;
using namespace System::ComponentModel;
using namespace System::Collections;
using namespace System::Windows::Forms;
using namespace System::Data;
using namespace System::Drawing;
public ref class Form1 : public System::Windows::Forms::Form
{
public:
Form1(void)
{InitializeComponent(); }
protected:
~Form1()
{if (components){delete components;}
}
private: System::Windows::Forms::Button^ button1;
private: System::Windows::Forms::Timer^ timer1;
private: System::ComponentModel::IContainer^ components;
protected:
private:
#pragma region Windows Form Designer generated code
void InitializeComponent(void)
{
this->components = (gcnew System::ComponentModel::Container());
this->button1 = (gcnew System::Windows::Forms::Button());
this->timer1 = (gcnew System::Windows::Forms::Timer(this->components));
this->SuspendLayout();
// button1
this->button1->Location = System::Drawing::Point(453, 252);
this->button1->Name = L"button1";
this->button1->Size = System::Drawing::Size(75, 23);
this->button1->TabIndex = 0;
|
|
|
this->button1->Text = L"button1";
this->button1->UseVisualStyleBackColor = true;
this->button1->Click += gcnew System::EventHandler(this, &Form1::button1_Click);
// Form1
this->AutoScaleDimensions = System::Drawing::SizeF(6, 13);
this->AutoScaleMode = System::Windows::Forms::AutoScaleMode::Font;
this->ClientSize = System::Drawing::Size(558, 300);
this->Controls->Add(this->button1);
this->Name = L"Form1";
this->Text = L"Form1";
this->Load += gcnew System::EventHandler(this, &Form1::Form1_Load);
this->Paint += gcnew System::Windows::Forms::PaintEventHandler(this, &Form1::Form1_Paint);
this->ResumeLayout(false);
}
#pragma endregion
private: System::Void button1_Click
(System::Object^ sender, System::EventArgs^ e)
{
//Close();
double tt=Convert::ToDouble("25,7e-3");
Close();
}
#pragma endregion
private:
System::Void Form1_Paint(System::Object^ sender,
System::Windows::Forms::PaintEventArgs^ e)
{
Graphics ^g = e->Graphics;
g->DrawString("Hello World!",
gcnew Drawing::Font("Arial", 30, FontStyle::Bold), Brushes::Red, 100.0, 110.0);
ShowLineJoin( e );
}
|
|
|
private:
void ShowLineJoin( PaintEventArgs^ e )
{
// Create a new pen.
Pen^ skyBluePen = gcnew Pen( Brushes::DeepSkyBlue );
// Set the pen's width.
skyBluePen->Width = 8.0F;
// Set the LineJoin property.
skyBluePen->LineJoin = System::Drawing::Drawing2D::LineJoin::Bevel;
// Draw a rectangle.
e->Graphics->DrawRectangle( skyBluePen, Rectangle(40,40,150,200) );
//Dispose of the pen.
delete skyBluePen;
}
// This example creates a PictureBox control on the form and draws to it.
// This example assumes that the Form_Load event handler method is
// connected to the Load event of the form.
private:
PictureBox^ pictureBox1;
void Form1_Load( Object^ /*sender*/, System::EventArgs^ /*e*/ )
{
pictureBox1 = gcnew PictureBox;
// Dock the PictureBox to the form and set its background to white.
pictureBox1->Dock = DockStyle::Fill;
pictureBox1->BackColor = Color::White;
// Connect the Paint event of the PictureBox to the event handler method.
pictureBox1->Paint += gcnew System::Windows::Forms::PaintEventHandler( this, &Form1::pictureBox1_Paint );
// Add the PictureBox control to the Form.
this->Controls->Add( pictureBox1 );
}
void pictureBox1_Paint( Object^ /*sender*/, System::Windows::Forms::PaintEventArgs^ e )
{
// Create a local version of the graphics object for the PictureBox.
Graphics^ g = e->Graphics;
// Draw a string on the PictureBox.
g->DrawString( "This is a diagonal line drawn on the control",
gcnew System::Drawing::Font( "Arial",10 ), System::Drawing::Brushes::Blue, Point(30,30) );
// Draw a line in the PictureBox.
g->DrawLine( System::Drawing::Pens::Red, pictureBox1->Left, pictureBox1->Top,
pictureBox1->Right, pictureBox1->Bottom );
}
};
}
Порядок выполнения работы.
1. При домашней подготовке необходимо изучить литературу по теме лабораторной работы.
2. Получить задание у преподавателя.
|
|
|
3. Разработать алгоритм решения задачи и написать программу, реализующую задание.
4. Проверить правильность ее работы.
5. Составить отчет и защитить работу.
Требования к отчету.
Отчет по лабораторной работе должен соответствовать требованиям, предъявляемым стандартами ТулГУ. Он должен содержать титульный лист, цели и задачи работы, текст задания, алгоритм и программную реализацию решения, теоретические положения, которые были использованы при выполнении лабораторной работы и контрольные примеры.
Варианты заданий.
1. Спроектировать приложение, на гавной форме которого поместить три кнопки: exit, beep, about.
Контрольные вопросы.
Лабораторная работа № 16.
Визуальное проектирование программ в среде VisualStudio. Ввод-вывод информации.
Цели и задачи работы
Теоретические положения.
Использование TextBox
Задание.
Спроектировать приложение, интерфейс которого включает форму, элемент вывода TextBox и кнопку.
При клике по кнопке в TextBox выводится строка текста.
Интерфейс.

Рис. Интерфейс приложения
Дата добавления: 2019-09-13; просмотров: 282; Мы поможем в написании вашей работы! |

Мы поможем в написании ваших работ!